top of page

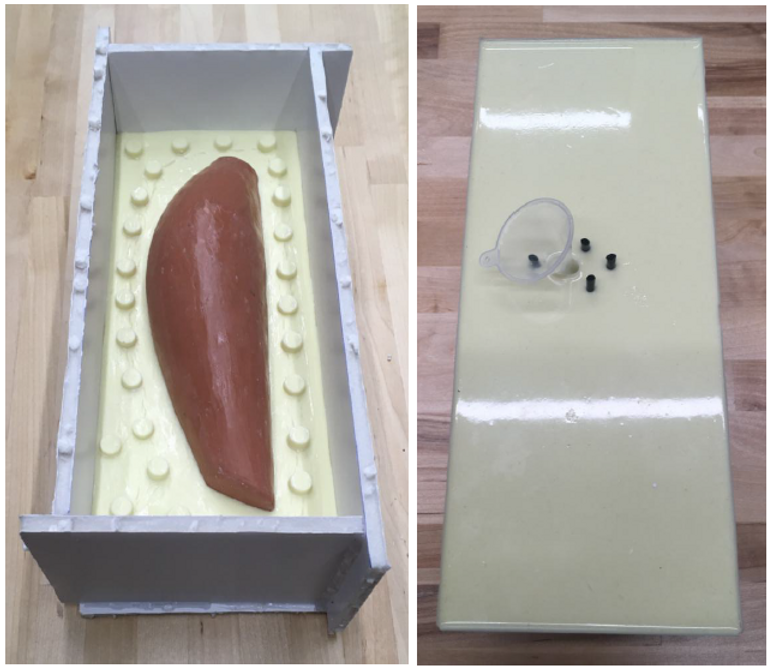
First, I put white clay underneath to hold my form and prevent it from rolling. I did this by making a valley. Then I put blobs of clay around the piece and started building up on that. I leveled the clay using a tool and brought the level down to midway of the piece. This was going to be my parting line. Once the clay portion was done, I cut up some foam core board and used hot glue to build walls around the clay. If there was a gap where the clay meets the inside of the wall, I just applied more clay to fill the gap and scraped it to be level with the rest of the clay. Next, I used the end of a tool to create registration marks to act as “keys” for alignment. Afterwards, I sprayed mold release inside the box as well as prepared and poured the first half of the silicone mold into the box.
Cast Party: Welcome

Cast Party: Welcome
After it cured, I removed the walls and separated the first half of the silicone mold. I noticed there was some clay stuck on the silicone mold so I cleaned it up using Clorox wipes. I no longer needed the white clay so I got rid of that and separated my prototype. Before putting the design form into the mold, I applied mold release in the cavity of the silicone mold so as to fill in potential gaps where the clay form and the silicone meet, thereby preventing the second pour of silicone from slipping in between potential gaps.
Cast Party: Welcome
Cast Party: Welcome
Once the clay form was placed inside the cavity, I applied another layer of mold release on the part and the silicone mold. Next, I used foam core board and hot glue to build up walls. I stuck a funnel at the highest point of my clay form. This is where I will pour my resin for casting. I prepared the second half of silicone mold and poured it in. Once the second half cured, I drilled weep holes around the pour spout and put straws so as to let air come out.
Cast Party: Text

Cast Party: Welcome
In preparation of casting, I sandwiched the two halves with foam core board and surrounded them with rubber bands to hold them together and apply even pressure. Then I prepared and poured resin. The first cast resulted with a little air pocket as well as a glossy film along the parting line. For the second cast, I put my mold into a pressurized tank. The result was an even bigger air pocket underneath the pour spout. There was a little bit of the glossy film along the parting line. The third casting still had an air bubble at the pour spout, and even less glossy film around the parting line.
Cast Party: Text

Cast Party: Welcome
I chose to finish the third casting by sanding the surface with 100 grit sandpaper. As I was sanding, I noticed I was revealing tiny air pockets so I decided rather than going deeper into the part I would finish the surface to be even smoother using 220 grit sandpaper followed by 400 grit sandpaper.
Cast Party: Text
bottom of page